
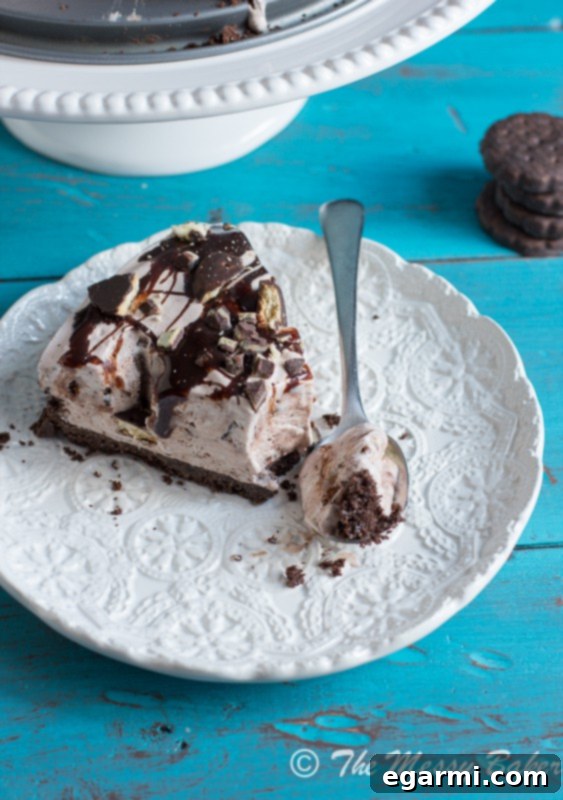
Indulge in Minty Bliss: The Ultimate No-Bake Thin Mint Ice Cream Pie
Experience a symphony of cool mint and rich chocolate with this delightfully refreshing ice cream pie, generously drizzled with decadent fudge and adorned with crunchy Andes mints and classic Thin Mint cookies.
Welcome to a culinary journey where convenience meets irresistible flavor! As part of a festive celebration, we’re thrilled to present a dessert that truly shines, perfect for holiday gatherings or any occasion where a touch of minty magic is desired. This recipe isn’t just a dessert; it’s a testament to the power of simple ingredients coming together to create something truly extraordinary. Get ready to discover your new go-to frozen treat that promises to impress with minimal effort.
The Irresistible Allure of a No-Bake Masterpiece
Every now and then, a recipe comes along that captures hearts and taste buds with its sheer deliciousness and remarkable simplicity. This Thin Mint Ice Cream Pie is precisely that kind of creation. Born from a series of amusing demands and inspired by a beloved classic, this pie takes the refreshing combination of mint and chocolate to a whole new level. Forget complicated baking steps or long hours in the kitchen; this is a no-bake wonder that promises maximum flavor payoff for minimal time investment.
The journey to this minty marvel began with a well-loved Peanut Butter Ice Cream Pie from Sally’s Baking Addiction, a recipe so good it inspired a craving in my own family that bordered on obsession. My father, a true peanut butter enthusiast, practically begged for it weekly, employing every tactic from sad-face texts to playful threats just to get his hands on a slice. This intense, shared love for ice cream pies set the stage for our very own mint-chocolate rendition.
From Family Antics to Culinary Inspiration
The saga of the ice cream pie continued with “Squirrel,” who, witnessing my father’s endless supply, quickly developed his own insatiable demand. What started as a simple request escalated into a playful but persistent campaign for his very own frozen dessert. The constant pleas for “pie” became a running joke, but also a catalyst for creativity. One day, Squirrel arrived home triumphantly with a carton of Breyer’s Thin Mint ice cream, declaring his desire for a “mint pie.” It was clear then that a new, specific mission had begun: to craft the ultimate Thin Mint Ice Cream Pie.
This playful rivalry and the sheer enthusiasm for frozen treats were the driving forces behind perfecting this recipe. While the teasing and the constant requests for immediate pie gratification were, at times, comical (and slightly exasperating!), they underscored a universal truth: a truly delicious dessert can bring immense joy and create memorable moments, even if it means a little playful negotiation along the way. And so, this minty dream pie was destined to become a reality, promising to satisfy even the most demanding sweet tooth.
Why This Thin Mint Ice Cream Pie Is a Must-Try
What makes this Thin Mint Ice Cream Pie stand out in the crowded world of desserts? It boils down to a few key factors: unparalleled ease, incredible flavor, and a texture that’s simply divine. This is the kind of recipe you turn to when you need a show-stopping dessert without the stress. It’s perfect for busy hosts, impromptu gatherings, or simply when a craving for something cool, creamy, and wonderfully minty strikes.
The beauty of this pie lies in its simplicity. With just 10 minutes of active prep time, you can assemble a dessert that tastes like it took hours. The combination of a crunchy chocolate cookie crust, a luscious mint ice cream filling swirled with whipped topping, and an abundance of chocolate-mint garnishes creates a multi-layered sensory experience. Each bite delivers that classic thin mint flavor profile – refreshing, rich, and utterly addictive.
Beyond its effortless preparation, this pie is also incredibly versatile. While we adore the Thin Mint ice cream base, you can easily customize it with your favorite mint chocolate chip ice cream or even experiment with other flavor combinations. It’s a forgiving recipe that encourages creativity, making it a staple in any dessert repertoire.
Crafting Your Perfect Minty Delight: A Step-by-Step Guide
Let’s dive into the delicious details of assembling this frozen masterpiece. You’ll be amazed at how quickly it comes together, leaving you more time to enjoy the accolades from your happy diners.
The Foundation: A Decadent Chocolate Cookie Crust
The crust: The base of any great ice cream pie is its crust, and for this minty creation, chocolate graham crackers are the undisputed champions. Their rich chocolate flavor provides the perfect contrast and complement to the cool mint filling. To prepare, simply pulverize approximately 15 chocolate graham crackers in your food processor until they resemble fine, uniform crumbs. The finer the crumbs, the more cohesive your crust will be. Once pulverized, stir in one stick of melted unsalted butter. This butter acts as the binding agent, coating every crumb with a rich, buttery goodness that helps the crust hold its shape and adds to its irresistible flavor. Press this mixture firmly into the bottom and up the sides of a 9-inch springform pan. A flat-bottomed glass or the back of a measuring cup works wonders for achieving an even, compact crust. This simple step ensures a sturdy base that won’t crumble when you slice into your frozen delight. Viola, your perfect chocolate crust is ready to chill!
The Heart of the Pie: Creamy Mint Ice Cream Filling
The innards: Now for the star of the show: the mint ice cream filling. For optimal texture and ease of mixing, allow your 1.5-quart container of Thin Mint ice cream to soften slightly at room temperature. This makes it pliable enough to work with without being completely melted. Once softened, gently fold in an 8-ounce container of thawed Cool Whip. The addition of Cool Whip isn’t just for volume; it creates an incredibly light, airy, and fluffy texture, transforming the ice cream into a truly decadent, yet surprisingly light, filling that spreads beautifully over the prepared crust. Ensure the two ingredients are thoroughly combined, creating a uniform, pastel green mixture that promises cool refreshment in every bite. Spread this dreamy mixture evenly over your chocolate graham cracker crust, smoothing the top with a spatula.
The Finishing Touches: Fudge Drizzle & Minty Crunch
To elevate this pie from great to extraordinary, we add a generous layer of toppings. Drizzle about 1/3 cup of rich chocolate fudge generously over the ice cream layer. The warm fudge will create enticing swirls and marble into the softened ice cream slightly, adding another dimension of chocolatey goodness. Next, sprinkle a vibrant array of crunchy toppings: 1/2 cup of coarsely crushed Thin Mint cookies (or similar grasshopper cookies for an extra minty punch) and 1/4 cup of chopped Andes mint pieces. These additions provide a delightful textural contrast and amplify the mint-chocolate experience. Cover your masterpiece carefully with plastic wrap, ensuring it doesn’t touch the top of the pie, and freeze for a minimum of 6 hours, or until completely firm. This crucial freezing time allows all the layers to set beautifully, making for clean slices and a perfectly chilled treat.
Tips for Ice Cream Pie Perfection
- Choose Your Ice Cream Wisely: While Thin Mint ice cream is specified, feel free to use your favorite mint chocolate chip variety. The quality of your ice cream will directly impact the final flavor of your pie.
- Soften, Don’t Melt: When preparing the filling, the goal is softened, not melted, ice cream. This ensures it mixes well with the Cool Whip without becoming soupy. About 15-20 minutes at room temperature usually does the trick.
- Pressing the Crust: A firm, even crust is key. Use the bottom of a glass or a flat measuring cup to really compact the crumbs, especially up the sides of the pan.
- Chilling is Crucial: Don’t rush the freezing process. A minimum of 6 hours, or preferably overnight, ensures the pie is firm enough to slice cleanly and hold its shape beautifully when served.
- Garnish Generously: The toppings aren’t just for looks; they add essential texture and flavor. Don’t skimp on the crushed cookies and Andes mints!
Serving and Storing Your Delicious Creation
When it’s time to unveil your Thin Mint Ice Cream Pie, prepare for an enthusiastic reception. This dessert is designed to be a crowd-pleaser, disappearing almost as quickly as it’s made. For the best slicing experience, let the pie sit at room temperature for about 5-10 minutes before cutting. This allows the ice cream to soften just enough to yield perfect slices without melting completely.
To serve, run a sharp knife under hot water and wipe it dry between each slice. This technique ensures clean, precise cuts every time. Leftovers, if any, can be stored in the springform pan, tightly covered with plastic wrap and aluminum foil, in the freezer for up to two weeks. However, based on experience, you might want to consider making two pies, as this one has a tendency to vanish in record time!
The chocolate crust, with its buttery and mildly sweet notes, creates the perfect vessel for the airy, super-creamy mint ice cream. Each mouthful is further enhanced by the rich, decadent fudge and the irresistible crunch of Andes mints and Thin Mint cookies. It’s a symphony of textures and flavors that will leave everyone craving just one more slice.
This Thin Mint Ice Cream Pie is more than just a dessert; it’s an experience. It will quickly become a cherished favorite, making appearances at celebrations, holidays, or simply as a well-deserved treat after a long week. Prepare to be asked for the recipe again and again!
Thin Mint Ice Cream Pie
A deliciously minty ice cream pie drizzled with fudge and sprinkled with Andes mint pieces and Thin Mint cookies.
Yield: 1 Pie
Total Time: 10 mintues
Prep Time: 10 minutes
Ingredients:
2 cups (approximately 15 crackers) chocolate graham cracker crumbs
1 stick unsalted butter, melted
1 (1.5 quart) container Thin Mint ice cream, slightly softened
1 (8-ounce) container Cool Whip, thawed
1/3 cup fudge
1/2 cup crushed Thin Mint pieces
1/4 cup Andes mint pieces
Directions:
In a bowl, stir together cracker crumbs and melted butter until evenly coated.
Press the cracker mixture into the bottom and up the sides of a 9-inch springform pan.
In a large bowl, fold the Cool Whip into the softened ice cream until throughly combined. Spread the ice cream mixture evenly over the crust.
Drizzle the fudge over the top of the pie. Sprinkle with Thin Mint cookie pieces and Andes mint pieces.
Cover and freeze for at least 6 hours, or until firm.
Inspired by Sally’s Baking Addiction.
All images and text ©One Sweet Mess.