
Indulge Guilt-Free: The Ultimate Skinny Peanut Butter Fudge Brownies
Skinny never tasted so good!
Life often throws little challenges our way, whether it’s navigating a mountain of laundry or simply trying to find a moment of peace in a chaotic day. For me, the basement floor sometimes resembles a battlefield, littered with gigantic laundry landmines as far as the eye can see. Laundry, in my humble opinion, is one of the most tedious chores known to humankind, even for someone who spends a fair amount of time washing dishes.
There are those incredibly organized and disciplined individuals who tackle such domestic duties with elegance and grace. I confess, I am not one of them. Just the other day, I found myself rummaging through endless piles of clothes, utterly confused about which were clean and which were dirty. In a moment of sheer desperation—or perhaps a temporary lapse in judgment—I resorted to the age-old, highly questionable method of sniffing. Let me tell you, it was the worst system ever devised.
Initially, some items offered a fleeting scent of a fresh summer’s day. That illusion, however, quickly shattered. After a few optimistic sniffs, I encountered a particularly offensive sock. I won’t sugarcoat it; that sock was a testament to the fact that my system was, indeed, the absolute worst. I couldn’t recall the exact moment I thought this peculiar strategy was a good idea, and frankly, I blame it on a momentary dip in my sanity. Quickly abandoning my time-saving efforts, I conceded defeat and tossed all the ambiguous items into the designated “dirty” pile. No one should ever have to subject themselves to sniffing a dirty sock; it’s simply not worth the sacrifice.
Instead of wrestling with fabric and questionable odors, I chose a far more appealing form of therapy: baking. Retreating to the kitchen, I decided to whip up a batch of these glorious Skinny Peanut Butter Fudge Brownies, a truly deserving reward after a bout with domestic chaos.
Embrace Indulgence: The Allure of Skinny Peanut Butter Fudge Brownies
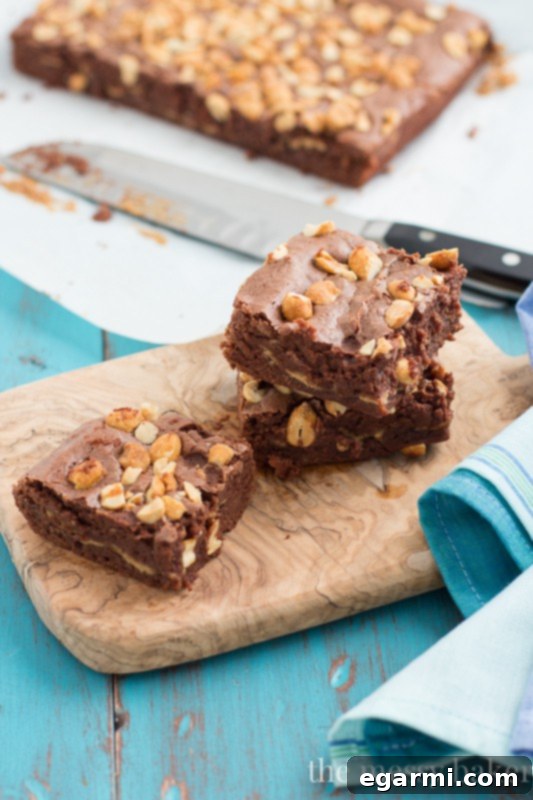
Who can resist the universal appeal of a rich, chocolatey brownie? Now, imagine that brownie is not only decadent but also “skinny,” allowing you to savor every bite without the usual guilt. These Skinny Peanut Butter Fudge Brownies take that concept to a whole new level. We’re talking about a luscious, fudgey brownie base, generously stuffed with gooey peanut butter, and then crowned with a delightful crunch of honey-roasted peanuts. It’s a symphony of textures and flavors that will captivate any peanut butter enthusiast.
For those who are truly nuts for peanut butter, this recipe is crafted specifically for you. It perfectly balances the deep cocoa notes with the creamy, nutty essence of peanut butter, creating a dessert that feels incredibly indulgent yet remains surprisingly light. These brownies redefine what a “healthy” treat can be, proving that you don’t have to sacrifice flavor for mindful eating.
Mastering the Art of Brownie Baking: Essential Tips for Perfection
Achieving brownie perfection requires a few simple yet crucial techniques. From preparing your pan to assembling the layers and ensuring a proper cool-down, these tips will elevate your baking game and guarantee outstanding results every time.
The Parchment Paper Method: Your Key to Flawless Brownies
One of the most vital steps to ensure your brownies come out of the pan beautifully and intact is proper pan lining. The secret lies in using parchment paper strategically. We want the parchment to overlap on all sides of the pan, creating “handles” that will allow you to effortlessly lift the entire slab of brownies out once they’ve cooled. To do this, take one piece of parchment and lay it across the pan in one direction, ensuring ample overhang. Then, take a second piece and lay it perpendicularly, creating an overlapping cross pattern, also with sufficient overhang. This method provides maximum coverage and leverage. Once your pan is perfectly lined, give the parchment a light spray with non-stick baking spray. This guarantees a truly non-stick surface, preventing your precious brownies from adhering to the pan and tearing when you try to remove them. It’s the ultimate safeguard against mangled brownies and ensures a clean, even slab of chocolatey deliciousness every single time.
Building the Flavor: Brownie Assembly for a Peanut Butter Dream
This recipe builds upon my tried-and-true skinny fudge brownie base. Why tinker with perfection when you’ve already found a winning formula, right? The key to these peanut butter stuffed brownies is the layering process, which ensures every bite is packed with both chocolate and nutty goodness.
- First Layer of Batter: Begin by pouring half of your prepared brownie batter into the parchment-lined pan. Using an offset spatula or the back of a spoon, gently spread the mixture evenly across the bottom, ensuring a consistent layer.
- Peanut Butter Core: Next, pour the melted peanut butter directly over this first brownie layer. Aim for an even distribution, perhaps swirling it slightly with a toothpick or knife for a marbled effect, though a simple pour is perfectly fine.
- Second Layer of Batter: Carefully pour the remaining brownie batter over the peanut butter layer. Again, spread it gently and evenly, making sure to cover the peanut butter completely without disturbing it too much.
- Crunchy Topping: Finally, sprinkle the chopped honey roasted peanuts generously over the top layer of brownie batter. These not only add a wonderful crunch but also enhance the overall peanut butter flavor.
The Golden Rule of Brownies: Cooling for Clean Cuts
Observe how effortlessly the entire slab of brownies lifts out of the pan, thanks to our smart parchment paper technique! No mangled edges, no sticky messes, just one perfectly even, chocolatey masterpiece. This is true brownie success! However, the journey to perfect squares isn’t quite over. It’s absolutely crucial to allow the brownies to cool completely before attempting to cut them. Cutting warm brownies is a common mistake that leads to frustration. The warm, gooey interior will stick to your knife, creating messy crumbs and uneven, “wonky” squares. Waiting for them to cool allows the brownies to set properly, resulting in clean, precise cuts and a much more appealing presentation. I know, patience can be challenging when the aroma of fresh brownies fills the air, but it’s a small price to pay for perfectly structured, picture-perfect brownies.
Just because we’re being mindful of what we eat doesn’t mean we should deny ourselves the simple pleasure of a delicious brownie. Honestly, what would life be like without the occasional, perfectly fudgy, peanut butter-infused brownie? It’s about finding balance, savoring the moments, and treating yourself wisely. These “skinny” brownies prove that you can have your cake—or, in this case, your brownie—and eat it too, entirely guilt-free!
Recipe: Skinny Peanut Butter Fudge Brownies
Yield: 1 8-by-8-inch pan (approximately 16 servings)
Prep Time: 10 minutes
Cook Time: 25 minutes
Total Time: 35 minutes
Description:
Decadent fudge brownies stuffed with a creamy peanut butter core and sprinkled with crunchy honey roasted peanuts, all made “skinny” for your guilt-free enjoyment. A perfect balance of rich chocolate and nutty flavor in a healthier package.
Ingredients:
- 2/3 cup dark chocolate chips (good quality for best flavor)
- 1 cup granulated sugar
- 2 large eggs, at room temperature
- 4 tablespoons unsalted butter, melted and slightly cooled
- 2/3 cup plain Greek yogurt (adds moisture and reduces fat)
- 1 teaspoon pure vanilla extract
- 2/3 cup + 2 tablespoons white whole wheat flour (or all-purpose flour)
- 1/4 teaspoon salt
- 1/2 cup creamy peanut butter (natural or regular, your preference)
- 1/2 cup honey roasted peanuts, coarsely chopped (for topping)
Directions:
- Prepare Your Pan: Preheat your oven to 350 degrees F (175 degrees C). Line an 8-by-8-inch square baking pan with two pieces of parchment paper, ensuring each piece overlaps the sides of the pan to create convenient “handles.” Lightly spray the parchment-lined pan with non-stick baking spray.
- Melt the Chocolate: In a heatproof bowl set over a saucepan of simmering water (double boiler), melt the dark chocolate chips until completely smooth. Stir occasionally. Once melted, remove the bowl from the heat and allow the chocolate to cool slightly, but remain pourable.
- Combine Wet Ingredients: In a large mixing bowl, whisk together the granulated sugar and eggs vigorously for about 1 minute, until the mixture is slightly pale and well combined. Gradually whisk in the melted butter, Greek yogurt, and vanilla extract until the mixture is smooth.
- Add Chocolate: Gently whisk the slightly cooled melted chocolate into the wet ingredient mixture until fully incorporated and smooth.
- Fold in Dry Ingredients: Using a rubber spatula, carefully fold in the white whole wheat flour and salt until just combined. Be careful not to overmix, as this can lead to tough brownies. Stop mixing as soon as no dry streaks of flour remain.
- Prepare Peanut Butter: Place the 1/2 cup of creamy peanut butter in a microwave-safe bowl. Heat it in the microwave for approximately 30 seconds, or just until it becomes pourable and slightly warm. This makes it easy to spread.
- Assemble the Layers:
- Pour half of the brownie batter into your prepared pan. Spread it evenly across the bottom using an offset spatula or the back of a spoon.
- Carefully pour the melted peanut butter over the first layer of brownie batter. You can gently spread it if desired, but don’t mix it into the batter.
- Pour the remaining brownie batter over the peanut butter layer. Gently spread it to cover the peanut butter completely, being careful not to disturb the layers too much.
- Finally, sprinkle the chopped honey roasted peanuts evenly over the top layer of batter.
- Bake: Bake in the preheated oven for 25-28 minutes, or until a wooden toothpick inserted into the center comes out mostly clean, with a few moist crumbs attached. Avoid overbaking, which can result in dry brownies.
- Cool and Cut: Allow the brownies to cool completely in the pan on a wire rack for at least 1-2 hours. This is a crucial step for clean cuts and optimal texture. Once fully cooled, use the parchment paper handles to lift the entire slab of brownies out of the pan. Place them on a cutting board and slice into even squares using a sharp, serrated knife.
All images and text © One Sweet Mess.
Whipping up one of my recipes? I wanna know about it! Snap a photo and tag your post with #onesweetmess on Twitter or Instagram. Seeing your creations come to life makes my day!