
Happy New Year, everyone! As we kick off a brand new year, many of us are embracing resolutions, fresh starts, and perhaps, a bit of much-needed rest after the holiday festivities. If you’re anything like me, you might be using this day to sleep in, nurse a festive hangover (those Bourbon Grapefruit Cocktails from last night were dangerously delicious!), or simply enjoy a quiet moment. But whether you’re recovering or ready to tackle new goals, there’s one thing that always brings comfort and joy: a batch of warm, homemade bread. And what could be better than a recipe steeped in tradition and love? Today, I’m thrilled to share a very special family heirloom: my Grandmom’s Famous Dinner Rolls.
Grandmom’s Rolls: A Timeless Family Recipe for Homemade Comfort
This month, I’m excited to be participating in #TwelveLoaves, a wonderful initiative created by Lora from Cake Duchess. The concept behind #TwelveLoaves is beautifully simple: to inspire home cooks and aspiring bakers to get into their kitchens and experience the incredible satisfaction of baking homemade bread. Each month, Lora hosts a different bread-baking project, and for January, we’re starting the new year with a clean slate – a loaf of bread that truly celebrates simplicity. And what better way to honor simplicity than with a foundational recipe that has stood the test of time?
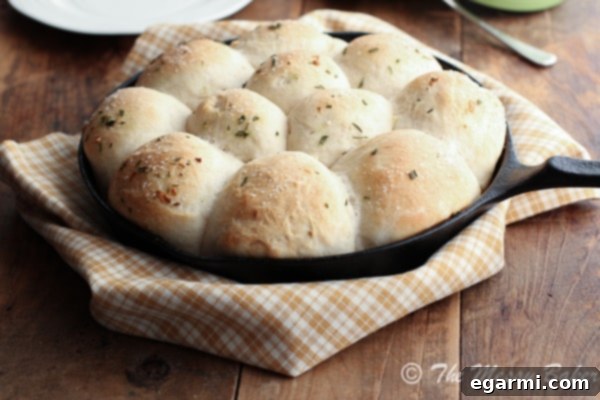
Today’s offering is more than just a recipe; it’s a piece of my history, a culinary legacy passed down through generations. These are Grandmom’s Rolls, a recipe I hold incredibly dear. These aren’t just any white rolls; they boast a perfectly crusty, golden-brown exterior that gives way to an interior so melt-in-your-mouth tender and fluffy, it’s almost ethereal. Every bite transports me back to my grandmother’s kitchen, filled with warmth and the irresistible aroma of freshly baked bread. I grew up watching her effortlessly transform simple ingredients into these masterpieces, and last year, I was fortunate enough to receive a hands-on lesson in the art of roll-making directly from her. This recipe is so forgiving and straightforward that it became my very first successful attempt at creating homemade bread, proving that even a beginner can achieve bakery-quality results.
Conquering Your Fear of Yeast: The Ultimate Beginner-Friendly Bread Recipe
I know the thought of making homemade bread can be a bit daunting for some. The idea of working with yeast, kneading dough, and waiting for it to rise can feel like a complex science experiment destined for failure. However, I promise you, once you master the basics with a reliable recipe like Grandmom’s Rolls, you’ll feel like a seasoned bread-making pro. This recipe is genuinely an excellent starter. If you consider yourself an amateur baker, or if the mere mention of yeast and sticky dough fills you with dread, this is the recipe that will change your mind.
Don’t just take my word for it. Let me introduce you to Shannon from A Periodic Table. Perhaps you don’t know Shannon? Shame on you! The girl can whip up intricate Momofuku Milk Bar treats in her sleep, but even she once harbored a fear of working with yeast, much like many of you. When Thanksgiving approached, I emailed Shannon my Grandmom’s bread recipe, urging her to give it a try. To her delight, and mine, she successfully made them for her holiday feast, and they turned out perfectly! She was ecstatic, and it proved once again just how incredibly easy and foolproof this recipe truly is. If Shannon can conquer her yeast fear with these rolls, so can you. It’s truly as easy as pie, but far more rewarding to pull from your own oven!
The Golden Rule of Yeast: Mind the Milk Temperature
While this recipe is simple, there’s one crucial step that can make or break your rolls, and it’s all about the milk temperature. The key to making beautifully risen, airy rolls is to ensure you do not overheat the milk. Yeast, remember, is a living organism. Just like us, it thrives in a warm, comfortable environment, but it can be killed by excessive heat. If your milk is too hot, it will prematurely kill the active dry yeast, resulting in dense, flat, and ultimately disappointing rolls. And trust me, we definitely don’t want that!
You don’t need a fancy kitchen thermometer to nail the temperature; your finger will work perfectly fine. Here’s the trick: heat the milk in a small saucepan until it’s hot enough that when you briefly dip your clean finger in, your reflexes kick in, and you want to pull it out. If you can’t comfortably keep your finger in the milk because it’s genuinely hot to the touch, then it’s just right. However, and this is a big, bold, important point: DO NOT boil the milk. I cannot stress this enough. I’m not yelling, but I want to make sure you avoid this common mistake. My dear dad, bless his heart, makes this error all the time, and then wonders why his rolls resemble hockey pucks. He’s inadvertently killing the yeast every time! Aim for a temperature that’s comfortably hot, but not scalding. Think of it like a very warm bath, not a boiling cauldron.
Once you’ve mastered the milk temperature, the rest is smooth sailing. The dough for these rolls will require two distinct rising periods. The first rise occurs after you’ve finished kneading the dough, allowing it to develop flavor and strength. The second rise happens after you’ve shaped the dough into individual balls, giving them their final fluffy texture before baking.
The Joy of Dough: A Therapeutic Baking Experience
For many, the best part about making bread from scratch is the hands-on experience of working with the dough. There’s something incredibly therapeutic and satisfying about the feel of the sticky, warm dough between your fingers as you knead it. It’s a primal connection to food, transforming simple flour and water into something magical. As you fold and work the dough, a subtle, sweet, malted smell rises, filling your senses and hinting at the deliciousness to come. This tactile and aromatic experience is what makes homemade bread baking truly special. It’s a moment to slow down, be present, and enjoy the process of creation.
Elevate Your Rolls: Herb Butter and Sea Salt Finish
While Grandmom’s Rolls are utterly delicious on their own, a touch of herb butter takes them to an entirely new level. Those little green specs you might notice in the photos are finely chopped rosemary. I prepare a simple yet incredibly flavorful melted garlic butter sauce, to which I add a generous amount of crushed fresh rosemary. The earthy, piney notes of rosemary, combined with pungent garlic, infuse the butter with an irresistible aroma and taste. After gently brushing this fragrant herb butter over the risen rolls just before baking, I sprinkle them with a touch of flaky sea salt. This not only adds a beautiful textural contrast but also enhances all the flavors, making each bite an unforgettable experience. The salt provides a delicate crunch and a savory counterpoint to the rich butter and fluffy bread.
Once baked to a perfect golden brown, these rolls are best served warm, preferably with another generous helping of softened, salted butter smeared on top. The moment you pull them apart, steam escaping, and inhale that comforting aroma, you’ll understand why they’re so beloved. These rolls aren’t just for special occasions; they are perfect for everyday meals, holiday gatherings, or simply as a comforting snack. They pair wonderfully with hearty stews, crisp salads, or alongside your favorite main course. I promise you, once you try this recipe, Grandmom’s Rolls will quickly become a cherished staple in your own recipe box, a tradition you’ll be eager to pass on. Enjoy the process, savor the aroma, and delight in every delicious bite!
Grandmom’s Rolls: The Easiest Fluffy Dinner Rolls You’ll Ever Make
Yield: 10-12 rolls
Total Time: 3 hours 30 minutes
Prep Time: 3 hours
Cook Time: 30 minutes
Ingredients:
For the Fluffy Dinner Rolls
- 1 package (about 2 1/4 teaspoons) active dry yeast
- 3/4 cup hot milk (ensure it’s hot to the touch, but never boiling)
- 3/4 cup hot tap water
- 1 1/2 tablespoons granulated sugar
- 3/4 teaspoon kosher salt
- 1 1/2 tablespoons shortening (vegetable shortening works best)
- 3 1/2 cups all-purpose flour, plus additional for kneading and dusting surfaces
For the Aromatic Herb Butter
- 4 tablespoons unsalted butter, melted
- 1 large garlic clove, finely crushed or minced
- 1 tablespoon fresh rosemary, finely chopped
- Flaky sea salt, for sprinkling (optional, but highly recommended)
Directions:
- Begin by preheating your oven to 350 degrees F (175 degrees C). Lightly grease a cast iron pan or an equivalent baking dish suitable for dinner rolls. This will prevent sticking and ensure a beautiful golden crust.
- In a spacious mixing bowl, combine the 3 1/2 cups of all-purpose flour with the active dry yeast. Use a whisk or fork to thoroughly mix them together. Set this dry mixture aside.
- In a small saucepan, gently heat the milk over medium-low heat until it is hot to the touch. Remember the “finger test” – it should be hot enough that you can’t keep your finger in it for long, but absolutely do not let it boil. Remove the saucepan from the heat immediately. Add the shortening, granulated sugar, and kosher salt to the hot milk. Stir continuously until the shortening has largely melted into the milk mixture (a few tiny lumps are perfectly normal). Finally, stir in the hot tap water to combine all the liquid ingredients.
- Create a small well in the center of your flour and yeast mixture. Carefully pour the warm milk mixture into this well. Using a spatula or a sturdy spoon, mix until a shaggy dough forms and all the flour is incorporated.
- Turn the dough out onto a lightly floured surface. Begin to knead the dough for approximately 6 minutes. As you knead, gradually add small amounts of additional flour, just enough to prevent the dough from being overly sticky and adhering to your hands or the surface. The goal is a smooth, elastic dough that springs back slightly when poked.
- Place the kneaded dough into a large, lightly greased bowl. Turn the dough over once to ensure both sides are coated with a thin layer of oil, preventing it from drying out. Cover the bowl with a clean dish towel and place it in a warm, draft-free spot. Allow the dough to rise for 90 minutes, or until it has roughly doubled in size.
- Once the first rise is complete, gently punch down the dough to release the air. Turn the dough out onto a lightly floured surface. Pull off pieces of dough, each about 3 inches in diameter, and gently roll them into smooth balls. Arrange these dough balls in your greased cast iron pan or baking dish, leaving about a 1/2-inch space between each roll to allow for expansion. Cover the pan with a clean dish towel and return it to a warm spot. Let the rolls rise for a second time for 1 hour before baking. This second rise is crucial for their light and fluffy texture.
- While the dough is undergoing its second rise, prepare the aromatic herb butter. In a small saucepan, melt the 4 tablespoons of unsalted butter over medium-low heat. Add the crushed garlic and finely chopped fresh rosemary. Allow it to simmer gently for about 2 minutes, letting the flavors of the garlic and rosemary beautifully marry and infuse the butter. Keep warm.
- Once the rolls have completed their second rise, use a pastry brush to generously brush them with the prepared herb butter. For an extra layer of flavor and a lovely visual appeal, sprinkle a pinch of flaky sea salt over the top of each roll.
- Place the pan in your preheated oven and bake for 25-30 minutes, or until the tops of the rolls are gloriously golden brown and they sound hollow when tapped. Serve these magnificent Grandmom’s Rolls warm, preferably with an additional generous helping of butter, and prepare to be delighted!
All images and text ©One Sweet Mess.