
Discover the simple joy of making homemade candied nuts – a perfectly sweet, irresistibly crunchy treat that elevates any dish or stands alone as a delightful snack.
Easy Homemade Candied Nuts: Your Ultimate Guide to Sweet Perfection
There’s something truly magical about a handful of perfectly candied nuts. Their delightful crunch, combined with a sweet, caramelized coating, makes them an incredibly versatile treat. Whether you’re looking for an elegant garnish for desserts, a sophisticated addition to a cheese board, a flavorful topping for salads, or simply a delicious snack to satisfy your sweet tooth, homemade candied nuts are an absolute game-changer. Forget the expensive store-bought versions; making them yourself is surprisingly simple, incredibly rewarding, and allows for endless customization. Today, we’re diving deep into the art of creating these delectable sugar-coated nuts, specifically using pecans, but rest assured, this method is adaptable for virtually any nut you desire.
Why Make Candied Nuts at Home?
Beyond the sheer enjoyment, there are several compelling reasons to embrace the DIY approach for candied nuts:
- Unbeatable Freshness: Store-bought options often sit on shelves, losing their peak flavor and crunch. Homemade nuts are fresh, fragrant, and burst with flavor.
- Cost-Effective: Buying quality candied nuts can be surprisingly expensive. Making them yourself, especially in larger batches, is significantly more economical.
- Customization Galore: This is where the fun truly begins! You have complete control over the sweetness, spices, and even the type of sugar used. Want a hint of cinnamon? A kick of cayenne? A touch of vanilla? The possibilities are endless.
- No Unwanted Additives: When you make it yourself, you know exactly what goes into your food. No obscure preservatives, artificial flavors, or excessive sugars – just pure, simple ingredients.
- Impressive & Thoughtful Gifts: A jar of homemade candied nuts makes for a wonderful, heartfelt gift during holidays, for housewarmings, or just because.
Essential Ingredients and Equipment
Before we embark on this sweet adventure, let’s gather our tools and treasures. The beauty of this recipe lies in its simplicity.
Key Ingredients:
- Nuts: While our focus today is on pecans, feel free to experiment with walnuts, almonds, cashews, peanuts, or a mix. Ensure they are raw and unsalted for best results. Roasting them beforehand can deepen their flavor, but it’s not strictly necessary as they will toast during the candying process.
- Granulated Sugar: This is the classic choice for a crisp, transparent coating. You can also experiment with brown sugar for a richer, chewier texture, or even a mix of both.
- Water (Optional, but Recommended): A tiny splash of water (about a tablespoon per half cup of sugar) can help the sugar dissolve more evenly and prevent premature burning, especially for beginners.
- Salt (Crucial!): A pinch of sea salt or kosher salt is not optional; it’s essential! Salt perfectly balances the sweetness, enhancing the overall flavor profile of your candied nuts.
Optional Flavor Enhancers:
- Cinnamon: A timeless pairing, especially with pecans or walnuts.
- Vanilla Extract: Adds a warm, aromatic depth. Add it right at the end, after removing from heat.
- Cayenne Pepper or Chili Powder: For a delightful sweet and spicy kick.
- Nutmeg, Cardamom, or Allspice: Great for a more complex, festive flavor.
- Orange or Lemon Zest: Provides a bright, citrusy note.
Essential Equipment:
- Heavy-Bottomed Sauté Pan or Skillet: A good quality, non-stick pan or a heavy-bottomed stainless steel pan is crucial for even heat distribution and preventing the sugar from burning.
- Wooden Spoon or Heat-Resistant Spatula: For stirring the nuts and sugar.
- Baking Sheet: A standard baking sheet will do.
- Parchment Paper or Silicone Baking Mat: Absolutely essential for cooling the nuts without them sticking to the pan. Do not skip this!
- Airtight Container: For proper storage of your delicious creations.
Step-by-Step Guide: How to Make Irresistible Candied Nuts
This method is straightforward, but requires your full attention. The entire process is quick, so stay by the stove!
1. Prepare Your Pan and Ingredients
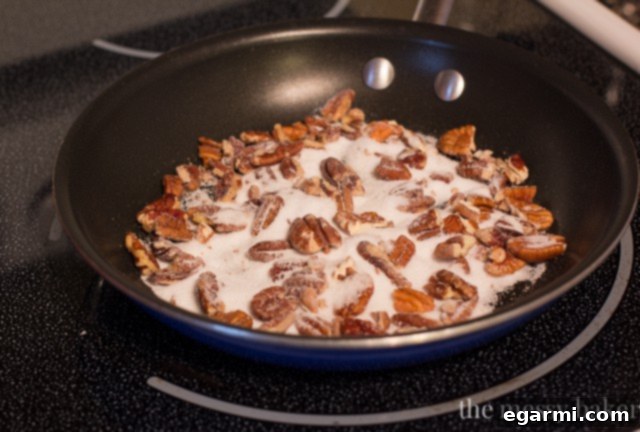
Into a sauté pan (preferably non-stick or heavy-bottomed for even heating), add 1/2 cup of your chosen nuts (pecans work wonderfully for this recipe) and 1/4 cup of granulated sugar. If you choose to add a tablespoon of water, add it now. Place the pan over medium heat. Resist the urge to turn the heat up too high, as this can cause the sugar to burn quickly before it properly melts and coats the nuts.
2. Begin the Caramelization Process
As the pan heats, the sugar will gradually begin to melt. It will first form clumps and then slowly liquefy, turning into a clear, amber-colored syrup. When you notice the sugar starting to melt around the edges and on the bottom of the pan, use a wooden spoon to gently and continuously stir the nuts. The goal here is to coat each nut evenly with the melting sugar.
3. Vigilance is Key: Watch Like a Hawk!
This entire candying process is incredibly fast, typically taking only about 5 to 7 minutes from start to finish. Do not leave the stove unattended. Sugar can go from perfectly caramelized to burnt in a matter of seconds. Keep stirring constantly to prevent hot spots and ensure an even toast. You’ll notice the sugar getting progressively darker and stickier. If you’re adding any spices like cinnamon or cayenne, sprinkle them in during the last minute of cooking to toast them slightly.
4. Achieve Perfect Toastiness
Continue to cook the nuts, stirring frequently, until the sugar is completely dissolved and forms a uniform, glossy coating on all the nuts. The nuts themselves will deepen in color, becoming visibly toasty and aromatic. You’ll smell the rich, nutty fragrance mingling with the sweet caramel. This is the moment to act swiftly. If you’re adding vanilla extract, stir it in quickly right after removing the pan from the heat.
5. Cool and Separate
Immediately transfer the hot nut and sugar mixture from the pan onto a baking sheet lined with parchment paper or a silicone baking mat. This step is critical, as the sugar will harden very quickly. Use your wooden spoon or spatula to spread the nuts into a single layer as much as possible, preventing them from clumping together excessively. As they cool, the sugar coating will harden into a crisp, glassy shell. Once cooled for a few minutes (while still slightly warm), you can gently break apart any larger clusters with your hands to separate individual nuts.
6. Proper Storage for Lasting Freshness
Allow the candied nuts to cool completely to room temperature before storing them. Once fully cooled and hardened, transfer them to an airtight container. They will retain their delightful crunch and flavor for up to 2 weeks when stored in your pantry at room temperature. It is crucial NOT to store candied nuts in the refrigerator, as the moisture can make them sticky and lose their crisp texture. For longer storage, up to a month, they can be frozen in an airtight container.
Creative Variations and Serving Suggestions
Now that you’ve mastered the basic technique, it’s time to unleash your creativity!
Flavor Variations:
- Sweet & Salty: Add a generous pinch of flaky sea salt right after spreading the nuts on the parchment paper.
- Spicy Kick: Incorporate 1/4 to 1/2 teaspoon of cayenne pepper or chili powder with the sugar for a delightful heat.
- Holiday Spice Blend: Mix in 1/2 teaspoon of pumpkin pie spice, apple pie spice, or a blend of cinnamon, nutmeg, and cloves.
- Herbaceous Twist: For a savory-sweet profile, finely chop a small sprig of fresh rosemary and add it during the last minute of cooking.
- Maple Glaze: Replace half of the granulated sugar with pure maple syrup for a rich, nuanced flavor (you might need to reduce the added water, if using).
Serving Suggestions:
- Snack It Up: Enjoy them straight out of the container for a satisfying, sweet, and crunchy treat.
- Salad Topper: Elevate any green salad, especially those with fruits, goat cheese, or blue cheese, with a sprinkle of candied nuts.
- Yogurt & Oatmeal: Add texture and sweetness to your breakfast bowls.
- Dessert Garnish: Perfect for ice cream sundaes, cupcakes, pies, tarts, or even a simple bowl of fruit.
- Cheese Boards & Charcuterie: Offer a sophisticated contrast to savory cheeses and cured meats.
- Holiday Platters: A must-have on any festive spread.
- Thoughtful Gifts: Pack them in pretty jars or bags with a ribbon for a homemade gift.
Troubleshooting Common Issues
Even though the process is simple, a few things can go wrong. Here’s how to prevent or fix them:
- Sugar Burned: This usually happens if the heat is too high or you stop stirring. Burnt sugar has a bitter taste. Unfortunately, there’s no saving it; you’ll need to start over with fresh ingredients. Maintain medium heat and constant stirring.
- Nuts Sticking Together: This is normal to some extent. Ensure you spread them out immediately after transferring to the parchment paper. If they cool into one big block, you can place them back on the baking sheet and briefly warm them in a low oven (around 200°F / 95°C) for 5-10 minutes, then separate them more easily before letting them cool completely again.
- Sugar Not Coating Evenly: This often means you haven’t stirred enough or the heat was inconsistent. Continuous, gentle stirring is key to ensure all nuts get a beautiful, even layer of melted sugar.
- Nuts Not Crunchy Enough: If your nuts aren’t as crisp as desired, it could be due to not cooking them long enough (the sugar didn’t fully caramelize) or moisture absorption during storage. Ensure they are fully cooled and stored in an airtight container.
Conclusion
Making homemade candied nuts is a delightful culinary endeavor that yields incredibly satisfying results. With just a few basic ingredients and a watchful eye, you can create a versatile, delicious treat that will impress guests and satisfy your cravings. From the subtle sweetness of plain candied pecans to the bold flavors of spiced almonds, the possibilities are endless. So, grab your pan, your favorite nuts, and get ready to indulge in the simple pleasure of perfectly sweet, perfectly crunchy homemade candied nuts. Happy candying!