
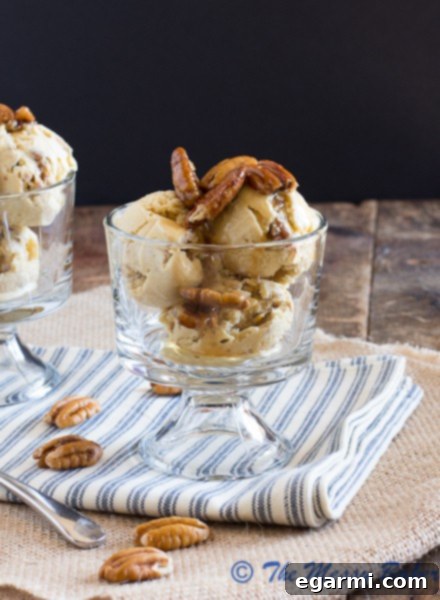
Indulge in Homemade Brown Butter Butterscotch Pecan Ice Cream: A Gourmet Treat for Any Season
Oh, Mother Nature, where have you gone? It seems you’ve left us to our own devices, caught in a swirling vortex of weather anomalies! Just two weeks ago, we were bundling up against an unexpected snowfall, only to find ourselves basking in a sweltering heatwave today, April 10th. The world, it seems, is utterly confused. One day it’s a winter wonderland, the next a summer scorcher, and then, just as quickly, the forecast promises another dip in temperature. It’s enough to make anyone yearn for a little consistency, or at least a truly delightful treat to help navigate these meteorological mood swings.
Perhaps you’re off enjoying a well-deserved vacation, Mother Nature? Picture it: pristine white beaches, a refreshing frozen cocktail adorned with a charming umbrella, and not a care in the world. While we certainly hope you’re having a wonderful time, a heads-up or perhaps a temporary replacement would have been greatly appreciated here on Earth! But fear not, even in the midst of this weather chaos, there’s a silver lining – a perfect excuse to create something truly extraordinary in the kitchen.
Since the mercury is soaring and the air is thick with the promise of unpredictable changes, I’ve whipped up a frozen delight that transcends seasons and brings pure joy. Forget the weather outside; inside, we’re crafting an experience. So, dust off your ice cream maker, grab your favorite scoop, and line up those cones, because we’re about to embark on a culinary adventure: homemade Brown Butter Butterscotch Pecan Ice Cream. Prepare yourself for an ovation – this is going to be magnificent!
Why This Brown Butter Butterscotch Pecan Ice Cream Stands Above the Rest
As a passionate baker and dessert enthusiast, I’ve had my fair share of ice cream creations. My kitchen has been a hub for diverse frozen experiments, from the tropical zest of pineapple coconut ice cream to the nostalgic comfort of chocolate banana cake batter shakes. I’ve even ventured into sophisticated territory with a delicate strawberry-pink champagne sorbet. Each one held its unique charm and satisfied a specific craving.
However, out of all the countless scoops I’ve churned and savored, this Brown Butter Butterscotch Pecan Ice Cream reigns supreme as my absolute favorite. It’s not just an ice cream; it’s a symphony of flavors and textures, meticulously balanced to create an unforgettable dessert experience. This isn’t just a recipe; it’s a culinary masterpiece that will elevate your perception of homemade frozen treats. It’s the kind of dessert that makes you close your eyes and truly savor every single spoonful.
The Irresistible Elements: A Deep Dive into Flavor and Texture
What makes this ice cream the “total package,” you ask? It begins with its remarkably velvety smooth consistency, so rich and extra creamy that it practically melts in your mouth. This isn’t your average icy, brittle scoop; this is a testament to the art of crafting a truly luxurious dessert base.
The magic truly begins with two star ingredients: brown butter and scotch. The brown butter introduces an incredible depth of nutty, toasted flavor that transforms the entire ice cream base, adding a sophisticated warmth that regular butter simply can’t achieve. Then, a touch of scotch (or bourbon, if you prefer) is incorporated, infusing the mixture with subtle caramel notes and a delightful complexity. This combination alone is a double dose of deliciousness, creating a butterscotch-like foundation that is rich, alluring, and utterly unique.
But the indulgence doesn’t stop there. As if the brown butter and scotch weren’t enough, this ice cream is generously loaded with buttery toasted pecans. These aren’t just any pecans; they are carefully prepared to be perfectly crunchy, adding a wonderful textural contrast and an extra layer of nutty flavor that complements the creamy base flawlessly. And for the grand finale, each serving is topped with a generous scattering of “wet pecans” – pecans delightfully coated in maple syrup, providing a soft, sticky chew and an added burst of sweetness that ties all the flavors together. The combination of toasted, buttery pecans within and the sweet, maple-glazed pecans on top creates an experience that is truly drool-worthy.
Once you taste this Brown Butter Butterscotch Pecan Ice Cream, you’ll understand why it’s a cut above the rest. It’s an artisanal treat that feels incredibly gourmet, yet it’s surprisingly achievable in your own kitchen. Prepare to be amazed, and trust me when I say, this exquisite creation won’t linger in your freezer for long. It’s simply too good to resist!
Brown Butter Butterscotch Pecan Ice Cream
Yield: 1.5 Quarts
Total Time: 24 hours (including chilling)
Prep Time: 24 hours (primarily chilling time)
Cook Time: 15 minutes
Ingredients:
- 5 1/2 tablespoons salted butter (for browning, adds depth to the butterscotch flavor)
- 3/4 cup packed light brown sugar (contributes to the rich butterscotch taste)
- 1/2 teaspoon kosher salt (enhances all the flavors)
- 2 cups heavy cream, divided (for a truly creamy texture)
- 3/4 cup whole milk (provides a balanced consistency)
- 6 large egg yolks (essential for creating a rich, smooth custard base)
- 1/2 teaspoon pure vanilla extract (a classic flavor enhancer)
- 1 tablespoon scotch (or bourbon, for a warming, complex note)
- 1 recipe buttered pecans, coarsely chopped (for texture and flavor within the ice cream)
- 1 cup pecan halves (the star nut of this recipe)
- 1 1/2 tablespoons salted butter (for that extra rich, buttery coating)
- 1/4 teaspoon kosher salt (to enhance the nutty flavor)
- 1 cup toasted pecans (can be pre-toasted or use the buttered pecans recipe without the butter/salt for a plain toasted version)
- 1/3 cup pure maple syrup (for that delightful sticky glaze)
Directions:
- In a medium-sized, heavy-bottomed saucepan, melt the 5 1/2 tablespoons of salted butter over medium-low heat. Continue to simmer, stirring occasionally, until the butter turns a rich golden brown and nutty aroma fills your kitchen, typically about 5 minutes. Be careful not to burn it! Remove from heat, then stir in the brown sugar and kosher salt until well combined and the sugar begins to dissolve. Whisk in 1 cup of heavy cream and the whole milk.
- Return the saucepan to medium-low heat and allow the brown sugar and cream mixture to gently come to a bare simmer. Meanwhile, pour the remaining 1 cup of heavy cream into a large, heat-proof bowl and set a fine-mesh strainer over the top. This setup will be used to quickly cool and strain your custard later.
- In a separate medium bowl, add the 6 egg yolks; whisk them thoroughly until they are uniformly yellow and slightly frothy. This is the crucial step for tempering: slowly pour about half of the warm milk mixture into the whisked egg yolks, whisking constantly and vigorously. This prevents the eggs from scrambling. Once combined, pour the warmed egg mixture back into the saucepan with the remaining milk mixture.
- Continue to stir the mixture constantly with a whisk over medium heat. Do not boil. The custard will gradually thicken, coating the back of a wooden spoon (or reaching about 175-180°F on an instant-read thermometer). This usually takes 5-8 minutes. Immediately remove from heat and pour the hot custard through the prepared strainer into the cold cream in the large bowl. Whisk it well into the cold cream; this helps stop the cooking process and ensures a smooth consistency. Stir in the vanilla extract and scotch (or bourbon).
- To ensure optimal creaminess and prevent ice crystals, cover the custard. Place a piece of plastic wrap directly on the surface of the custard (to prevent a skin from forming), then place the lid on the container. Refrigerate the mixture for at least 8 hours, but preferably 24 hours, or until it is completely chilled through. This chilling step is vital for the best ice cream texture.
- Once thoroughly chilled, churn the ice cream in your ice cream maker according to the manufacturer’s instructions. The churning process typically takes 20-30 minutes, resulting in a soft-serve consistency. When the ice cream is almost finished churning, during the last 5 minutes, add the coarsely chopped buttered pecans to the machine.
- Transfer the freshly churned ice cream to an airtight container. Use a rubber spatula to gently fold and ensure the pecans are evenly distributed throughout. Freeze for a minimum of 4-6 hours, or until firm, before serving.
- When ready to serve, scoop generously into bowls or cones, top with the prepared wet pecans, and dig in! Enjoy this masterpiece of flavor.
- Preheat your oven to 350 degrees F (175°C).
- In a small skillet, melt the 1 1/2 tablespoons of salted butter over medium-low heat. Add the pecan halves to the skillet and stir until they are thoroughly coated in the melted butter. Sprinkle evenly with 1/4 teaspoon of kosher salt.
- Spread the buttered pecans in a single layer onto a baking sheet. Toast in the preheated oven for 8-10 minutes, or until fragrant and lightly golden. Keep a close eye on them to prevent burning.
- Remove from the oven and let cool completely on the baking sheet. Once cooled, they will become crispier. Coarsely chop them before adding to the ice cream.
- Place the 1 cup of toasted pecans (either freshly toasted or store-bought) into a small bowl. Pour the 1/3 cup of pure maple syrup over the pecans and stir until they are fully coated.
- Allow the pecans to sit at room temperature for at least 1 hour. This allows the pecans to absorb the maple syrup, creating that delightful “wet” texture and enhanced sweetness.
- Store any leftover wet pecans in an airtight container in the refrigerator for up to 1 month. They are fantastic on other desserts too!