
Candied nuts are easy to make, perfectly sweet, and great for sprinkling on just about anything.
Homemade Candied Nuts: The Ultimate Sweet & Crunchy Treat
There’s something irresistibly delightful about candied nuts. Their perfect blend of sweetness and crunch makes them a versatile culinary gem, ideal for a quick snack, an elegant salad topping, a charming dessert garnish, or even a thoughtful homemade gift. While they often command a premium price at specialty stores, the good news is that making them at home is incredibly simple, surprisingly fast, and far more rewarding. Forget complicated techniques; with just a few basic ingredients and a watchful eye, you can transform ordinary nuts into extraordinary sweet treats right in your own kitchen.
In this comprehensive guide, we’ll walk you through the process of creating flawless sugar-coated nuts. We’ll cover everything from selecting the best nuts to mastering the perfect caramelization, ensuring your homemade candied nuts are always golden, crunchy, and utterly delicious. Get ready to elevate your snacking game and impress your friends and family with this easy-to-follow recipe that promises perfect results every time.
Why Make Your Own Candied Nuts?
Beyond the sheer joy of creating something delicious from scratch, there are numerous compelling reasons to embark on your own candied nut adventure:
- Unbeatable Freshness: Store-bought options can often sit on shelves for weeks. Making them yourself guarantees the freshest, most vibrant flavors and the crispiest texture.
- Cost-Effective: Buying pre-candied nuts can be surprisingly expensive. This homemade version uses common pantry staples and nuts, saving you money in the long run, especially if you buy nuts in bulk.
- Customization is Key: Love cinnamon? Crave a hint of spice? Want to try different nut varieties? When you make them at home, you’re the chef! You can tailor the sweetness, spice levels, and even add unique flavorings like vanilla extract or citrus zest to perfectly match your preferences.
- Simple Ingredients: You know exactly what goes into your snack. No artificial flavors, preservatives, or unpronounceable ingredients – just nuts, sugar, and perhaps a touch of spice.
- Effortless Elegance: Candied nuts add a touch of gourmet sophistication to any dish or occasion without requiring complex culinary skills.
Essential Ingredients You’ll Need
The beauty of this recipe lies in its simplicity. You only need a couple of core ingredients, with room for plenty of delicious additions:
- Nuts: For this tutorial, we’re showcasing pecans, which caramelize beautifully and offer a rich, buttery flavor. However, the world is your oyster when it comes to nuts! Almonds, walnuts, cashews, peanuts, and even a mixed nut blend work wonderfully. Ensure your nuts are raw and unsalted for the best results, allowing you full control over the flavor profile.
- Granulated Sugar: This is the magic ingredient that transforms into a glossy, crunchy coating. While we’re using white granulated sugar, you could experiment with brown sugar for a deeper, more molasses-like flavor, though it melts a little differently.
- Water (Optional but Recommended): A tablespoon or two of water can help the sugar dissolve more evenly and prevent it from burning too quickly, especially for beginners.
Optional Flavor Enhancers:
- Salt: A tiny pinch of sea salt or kosher salt balances the sweetness and enhances the overall flavor of the nuts. Don’t skip this; it makes a huge difference!
- Vanilla Extract: A splash of pure vanilla extract adds warmth and depth to the caramel flavor.
- Ground Cinnamon: A classic pairing with nuts, especially pecans and walnuts, adding a cozy, aromatic touch.
- Other Spices: Nutmeg, cardamom, or even a pumpkin pie spice blend can be fantastic.
- Cayenne Pepper: For those who love a sweet and spicy kick, a dash of cayenne pepper introduces an exciting contrast.
Equipment for Candied Nut Success
You likely already have most of these items in your kitchen:
- Large Sauté Pan: A heavy-bottomed, non-stick sauté pan is ideal. The heavy bottom helps distribute heat evenly, preventing hot spots and burning. A non-stick surface makes cleanup much easier.
- Wooden Spoon or Heat-Resistant Spatula: Essential for stirring the nuts and sugar without scratching your pan.
- Parchment Paper or Silicone Baking Mat: Absolutely crucial for cooling the nuts. This prevents them from sticking to your baking sheet and makes removal effortless.
- Baking Sheet: To lay out the parchment paper and allow the nuts to cool in a single layer.
- Airtight Container: For proper storage to maintain freshness and crunch.
Now that you’re armed with all the knowledge and tools, let’s get to the delicious part!
Step-by-Step Guide: How to Make Perfect Candied Nuts
This simple process takes less than 10 minutes active cooking time, so pay close attention!
Step 1: Combine Nuts and Sugar in the Pan
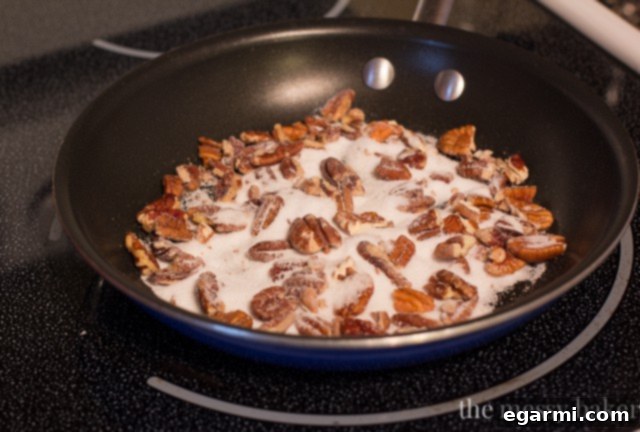
Add 1/2 cup of pecans (or your chosen nuts) and 1/4 cup of granulated sugar to a sauté pan. You can also add a tablespoon of water here if you prefer a slightly slower, more controlled caramelization process, which can be helpful for beginners. Place the pan over medium heat. The goal here is to gently melt the sugar, allowing it to slowly dissolve and transform into a luscious syrup that will coat each nut.
Step 2: Stir Gently as Sugar Melts
As the sugar begins to melt and turn translucent around the edges, use a wooden spoon or heat-resistant spatula to gently but continuously stir the nuts. The sugar will first clump around the nuts, looking a bit grainy. Don’t worry, this is normal! Continue stirring. The heat will eventually cause all the sugar crystals to melt, forming a sticky, clear syrup that clings beautifully to the nuts. Ensure every nut gets a good coating.
Step 3: Maintain Vigilance – The Crucial 5 Minutes
This entire process typically takes only about 5 minutes, so it’s absolutely essential to “watch the pan like a hawk.” Do not leave the stove, even for a moment. Sugar can go from perfectly caramelized to burnt and bitter in a matter of seconds. Keep stirring, observing the sugar’s color change from clear to a light amber, then to a beautiful golden brown. You’ll also notice the nuts themselves becoming more fragrant and taking on a slightly deeper, toasted hue. This is the stage where you can add any optional flavorings like a pinch of salt, vanilla extract, or spices like cinnamon or cayenne pepper. Stir them in quickly to incorporate.
Step 4: Cook Until Perfectly Toasted and Coated
Continue to cook the nuts, stirring occasionally, until the sugar is completely dissolved into a glossy, amber syrup, and the nuts themselves are beautifully toasted. The deep, rich aroma will tell you they are ready. The syrup should be a uniform, deep golden color – not too dark, which indicates burning, and not too pale, which means the sugar hasn’t fully caramelized. Once they reach this stage, immediately remove the pan from the heat.
Step 5: Cool Completely on Prepared Surface
Quickly transfer the hot, sugar-coated nuts onto a parchment-lined or silicone-lined baking sheet. Spread them out into a single layer using your wooden spoon or spatula to prevent them from clumping together as they cool. The sugar will be extremely hot and sticky, so avoid touching it directly. Allow the nuts to cool completely, which will take about 15-20 minutes. As they cool, the sugar coating will harden and become wonderfully crisp. Once fully cooled, break apart any nuts that have stuck together.
Step 6: Proper Storage for Lasting Freshness
Store your cooled, crunchy candied nuts in an airtight container at room temperature. A pantry or cupboard is ideal. They will maintain their freshness and crispness for up to 2 weeks. It’s crucial not to store candied nuts in the refrigerator, as the moisture and cold can cause the sugar coating to become sticky and soft, losing that delightful crunch. If they do become slightly soft, you can spread them on a baking sheet and toast them in a low oven (around 250°F / 120°C) for 5-10 minutes to crisp them up again.
Tips for Candied Nut Perfection
- Don’t Overcrowd the Pan: If making a larger batch, work in smaller portions. Overcrowding cools the pan too much, leading to uneven cooking and potentially a sticky mess rather than a crispy coating.
- Use a Heavy-Bottomed Pan: This ensures even heat distribution and reduces the risk of burning.
- Have Everything Ready: This recipe moves fast! Have your nuts measured, sugar ready, wooden spoon at hand, and baking sheet lined before you start heating the pan.
- Embrace the Salt: A small pinch of salt truly elevates the flavor, cutting through the sweetness and bringing out the natural nuttiness.
- Experiment with Flavors: Don’t be afraid to try different spices or extracts. A touch of orange zest, a dash of ginger, or even a hint of espresso powder can create unique and delicious variations.
- Low and Slow (to start): While the overall process is quick, starting on medium heat allows the sugar to melt gradually and evenly without scorching.
Delicious Variations and Serving Suggestions
Once you master the basic recipe, the possibilities are endless! Here are some ideas to inspire your culinary creativity:
Flavor Variations:
- Sweet & Spicy Candied Nuts: Add 1/4 teaspoon of cayenne pepper (or more to taste) along with the sugar. The heat provides a wonderful contrast to the sweetness.
- Cinnamon Sugar Candied Nuts: Stir in 1/2 teaspoon of ground cinnamon during the last minute of cooking for a classic, comforting flavor.
- Vanilla Bean Candied Nuts: Add 1/2 teaspoon of vanilla extract just before removing from heat for an extra aromatic touch.
- Rosemary Sea Salt Candied Nuts: For a more sophisticated, savory-sweet snack, add 1 tablespoon of finely chopped fresh rosemary and a generous pinch of flaky sea salt during the last minute of cooking.
- Coffee Candied Nuts: Add 1/2 teaspoon of instant espresso powder to the sugar mixture for a subtle coffee undertone.
How to Enjoy Your Homemade Candied Nuts:
- Snacking: They are perfect on their own as a satisfying and delicious snack.
- Salad Topping: Elevate any salad! Candied pecans or walnuts are particularly fantastic with mixed greens, goat cheese, apples, and a vinaigrette dressing.
- Dessert Garnish: Sprinkle over ice cream, yogurt parfaits, fruit crumbles, cheesecakes, or even a simple bowl of sliced fruit.
- Breakfast Booster: Add crunch to your oatmeal, granola, or even pancakes and waffles.
- Cheese Boards & Charcuterie: Offer them as a sweet contrast to savory cheeses, cured meats, and crackers.
- Baking Ingredient: Chop them up and fold them into cookie dough, muffin batter, or sprinkle them on top of cakes and breads before baking.
- Homemade Gifts: Package them in pretty jars or cellophane bags tied with a ribbon for a thoughtful and delicious gift during holidays or special occasions. Everyone loves an edible gift!
Final Thoughts: Your New Go-To Treat
Making your own candied nuts is a simple pleasure that yields impressive results. It’s a testament to how a few basic ingredients can create something truly special. Whether you’re looking for a quick, wholesome snack, an elegant addition to your culinary creations, or a charming gift from the heart, this recipe has you covered. So, gather your ingredients, set aside a few minutes, and prepare to indulge in the warm, sweet, and crunchy delight of homemade candied nuts. Happy cooking!